Tutorial: UI for Buying Shipments

In this tutorial, we will create a sample web application to buy shipments, create labels, and verify addresses using the EasyPost API.

We'll be using Ruby, Sinatra, and the EasyPost Client Gem in this example application, but this functionality could be integrated into any app written with Python, PHP, Java and other languages supported by the many EasyPost official client libraries.

Before You Start

  1. Sign up for an EasyPost account or log in to an existing account.
  2. Read the Getting Started Guide.
  3. Make sure you have Ruby and Bundler installed.
  4. Make an Address to use as your from_address, and save its ID (adr_xxxx).

Step 1: Getting your Keys

The first thing we need is an API key from EasyPost. This is an example application, so we are going to use the test API key, but be aware that non-test data will still be visible. You can find the test key on the API Keys Page.

Next, create a new directory for your project, and open your favorite code editor and create a new file called .env in your new folder. Fill in the test EasyPost API key so it looks like this:

.env

EASYPOST_API_KEY=<YOUR_TEST/PRODUCTION_API_KEY>
FROM_ADDRESS_ID=<YOUR_FROM_ADDRESS_ID>

Step 2: Creating the App

2.1 Declare Dependencies

We will start out by creating a file named Gemfile to describe gem dependencies for our Ruby code. A gem is a Ruby package that will install the libraries that we need. Your Gemfile should always be in the root of your project directory, as this is where Bundler, the Ruby dependency manager, expects it to be.

Time to add some gems. Let's add the easypost gem to communicate with the API, sinatra for our web application, and dotenv to load our configuration values in. Your Gemfile should look like this:

Gemfile

source 'https://rubygems.org'
gem 'easypost'
gem 'sinatra'
gem 'dotenv'

Install the Gemfile-defined dependencies by running bundle install from your project root in the terminal.

2.2 Create a Basic "Hello World" Application

Now, we can start writing our web application. Create a file called app.rb and save it to the root directory. This will define the web application. For now, let us add a "Hello World" snippet like below:

app.rb

require 'sinatra/base'
require 'easypost'
require 'tilt/erb'
require 'dotenv'

class App < Sinatra::Base
  configure :development, :test do
    Dotenv.load
  end
  configure do
    EasyPost.api_key = 'EASYPOST_API_KEY'
  end

  get '/' do
    'Hello World'
  end

  # start the server if this file is executed directly
  run! if app_file == $PROGRAM_NAME
end

We did four things here:

  • require: require statements import the dependencies that Bundler installed for us.
  • Dotenv.load: Loads config variables from our .env file
  • EasyPost.api_key: Assigns our API Key to the EasyPost Class
  • get '/': Set up a route for the server at /

To check if your app is working, run bundle exec ruby app.rb and you should see the following:

[2016-06-07 15:51:45] INFO  WEBrick 1.3.1
[2016-06-07 15:51:45] INFO  ruby 2.0.0 (2015-04-13) [universal.x86_64-darwin15] == Sinatra (v1.4.7) has taken the stage on 4567 for development with backup from WEBrick
[2016-06-07 15:51:45] INFO  WEBrick::HTTPServer#start: pid=3336 port=4567

Go ahead and visit http://localhost:4567/ and you should see the text "Hello world" on the page.

You can stop the application with Ctrl-C. In the next step, we will create a view that displays a form to create a shipment, rendered by the '/' route.

2.3 Add a Shipment Form

In order to create a view, make a new directory called views in your project folder. Add a file named layout.erb to the views folder. The layout will contain the HTML layout that is common to all pages. We can yield the views from the layout. You can add the following content to the layout:

/views/layout.erb

<!DOCTYPE html>
<html>
  <head>
    <meta charset="utf-8">
    <!-- CSS Reset -->
    <link rel="stylesheet" href="//cdnjs.cloudflare.com/ajax/libs/normalize/3.0.3/normalize.css">
    <!-- Milligram CSS minified -->
    <link rel="stylesheet" href="//cdnjs.cloudflare.com/ajax/libs/milligram/1.1.0/milligram.min.css">
    <!-- JQuery -->
    <script src="//code.jquery.com/jquery-1.12.0.min.js"></script>
    <title>UI for Buying Shipments with EasyPost</title>
  </head>
  <body>
    <div class="container">
      <a href="/"><h5><strong>UI for Buying Shipments with EasyPost</strong></h5></a>
      <%= yield %>
    </div>
    <script type="text/javascript">
      // Parcels require more parameters. Hide fields if not a Parcel
      $(document).ready(function() {
          $('#selector').on("change", function(value) {
          value = $(this).val();
          hideShowInput(value);
        });
      });

      function hideShowInput(option){
        if( option === "Parcel") {
          $('#hide-input').show();
        }
        else{
          $('#hide-input').hide();
        }
      }
    </script>
  </body>
</html>

Now add index.erb to the views directory. It will contain a form to enable users to input data for the following:

  • To Address (/views/_address.erb)
  • Parcel Details (/views/_parcel_details.erb)

Considering that there are many fields for each of the above objects, we can create partial views to enable abstracting and reusing certain portions of the form. We can abstract the address input fields into a partial by creating a file inside the views folder named _address.erb .

The form will only include a "To Address" representing the customer address. The "From Address" we will load from .env, as mentioned at the beginning of the tutorial. To input parcel details, create another partial named _parcel_details.erb in the views folder and include the fields for parcel details. Here's how you can go about it:

/views/index.erb

<form action='/shipment' method='post' role="form">
  <%= erb :_address, locals: {name: "To Address"}  %>
  <%= erb :_parcel_details %>
  <input type='submit' value='Get Rate'>
</form>

/views/_address.erb

<label><%= name %></label>
<input type="text" name="address[name]" placeholder="First and Last Name">
<input type="text" name="address[company]" placeholder="Company Name">
<input type="text" name="address[street1]" placeholder="Street Address 1" required>
<input type="text" name="address[street2]" placeholder="Street Address 2">
<input type="text" name="address[city]" placeholder="City" required>
<input type="text" name="address[state]" placeholder="State" required>
<input type="text" name="address[zip]" pattern="\d{5}" placeholder="Zipcode (12345)" required>
<input type="text" name="address[phone]" placeholder="Phone (123-456-7890)">

/views/_parcel_details.erb

<label>USPS Options</label>
<select id="selector" name="parcel[predefined_package]">
  <option value="Card">Flat Rate Card</option>
  <option value="FlatRateEnvelope">Flat Rate Letter Envelope</option>
  <option value="FlatRateGiftCardEnvelope">Flat Rate Gift Card Envelopes</option>
  <option value="FlatRateWindowEnvelope">Flat Rate Window Envelopes</option>
  <option value="SmallFlatRateEnvelope">Flat Rate Small Envelopes</option>
  <option value="FlatRatePaddedEnvelope">Flat Rate Padded Envelopes</option>
  <option value="FlatRateLegalEnvelope">Flat Rate Legal Envelopes</option>
  <option value="SmallFlatRateBox">Flat Rate Small Box</option>
  <option value="MediumFlatRateBox">Flat Rate Medium Boxes</option>
  <option value="LargeFlatRateBox">Flat Rate Large Box</option>
  <option value="Parcel" Selected>Parcel</option>
</select>

<div id="hide-input">
  <label>Custom Parcel Details</label>
  <input type="number" name="parcel[width]" placeholder="Width (in)">
  <input type="number" name="parcel[length]" placeholder="Length (in)">
  <input type="number" name="parcel[height]" placeholder="Height (in)">
</div>
<p>Note: If you have chosen a Flat Rate package option, only weight is required</p>
<input type="number" step="any" name="parcel[weight]" placeholder="Weight (oz)" required>

Now we'll hook up the '/' route to our erb view in app.rb. Replace the "Hello World" string in get '/' with erb :index. This renders the index view we just created.

/views/app.rb

get '/' do
  erb :index
end

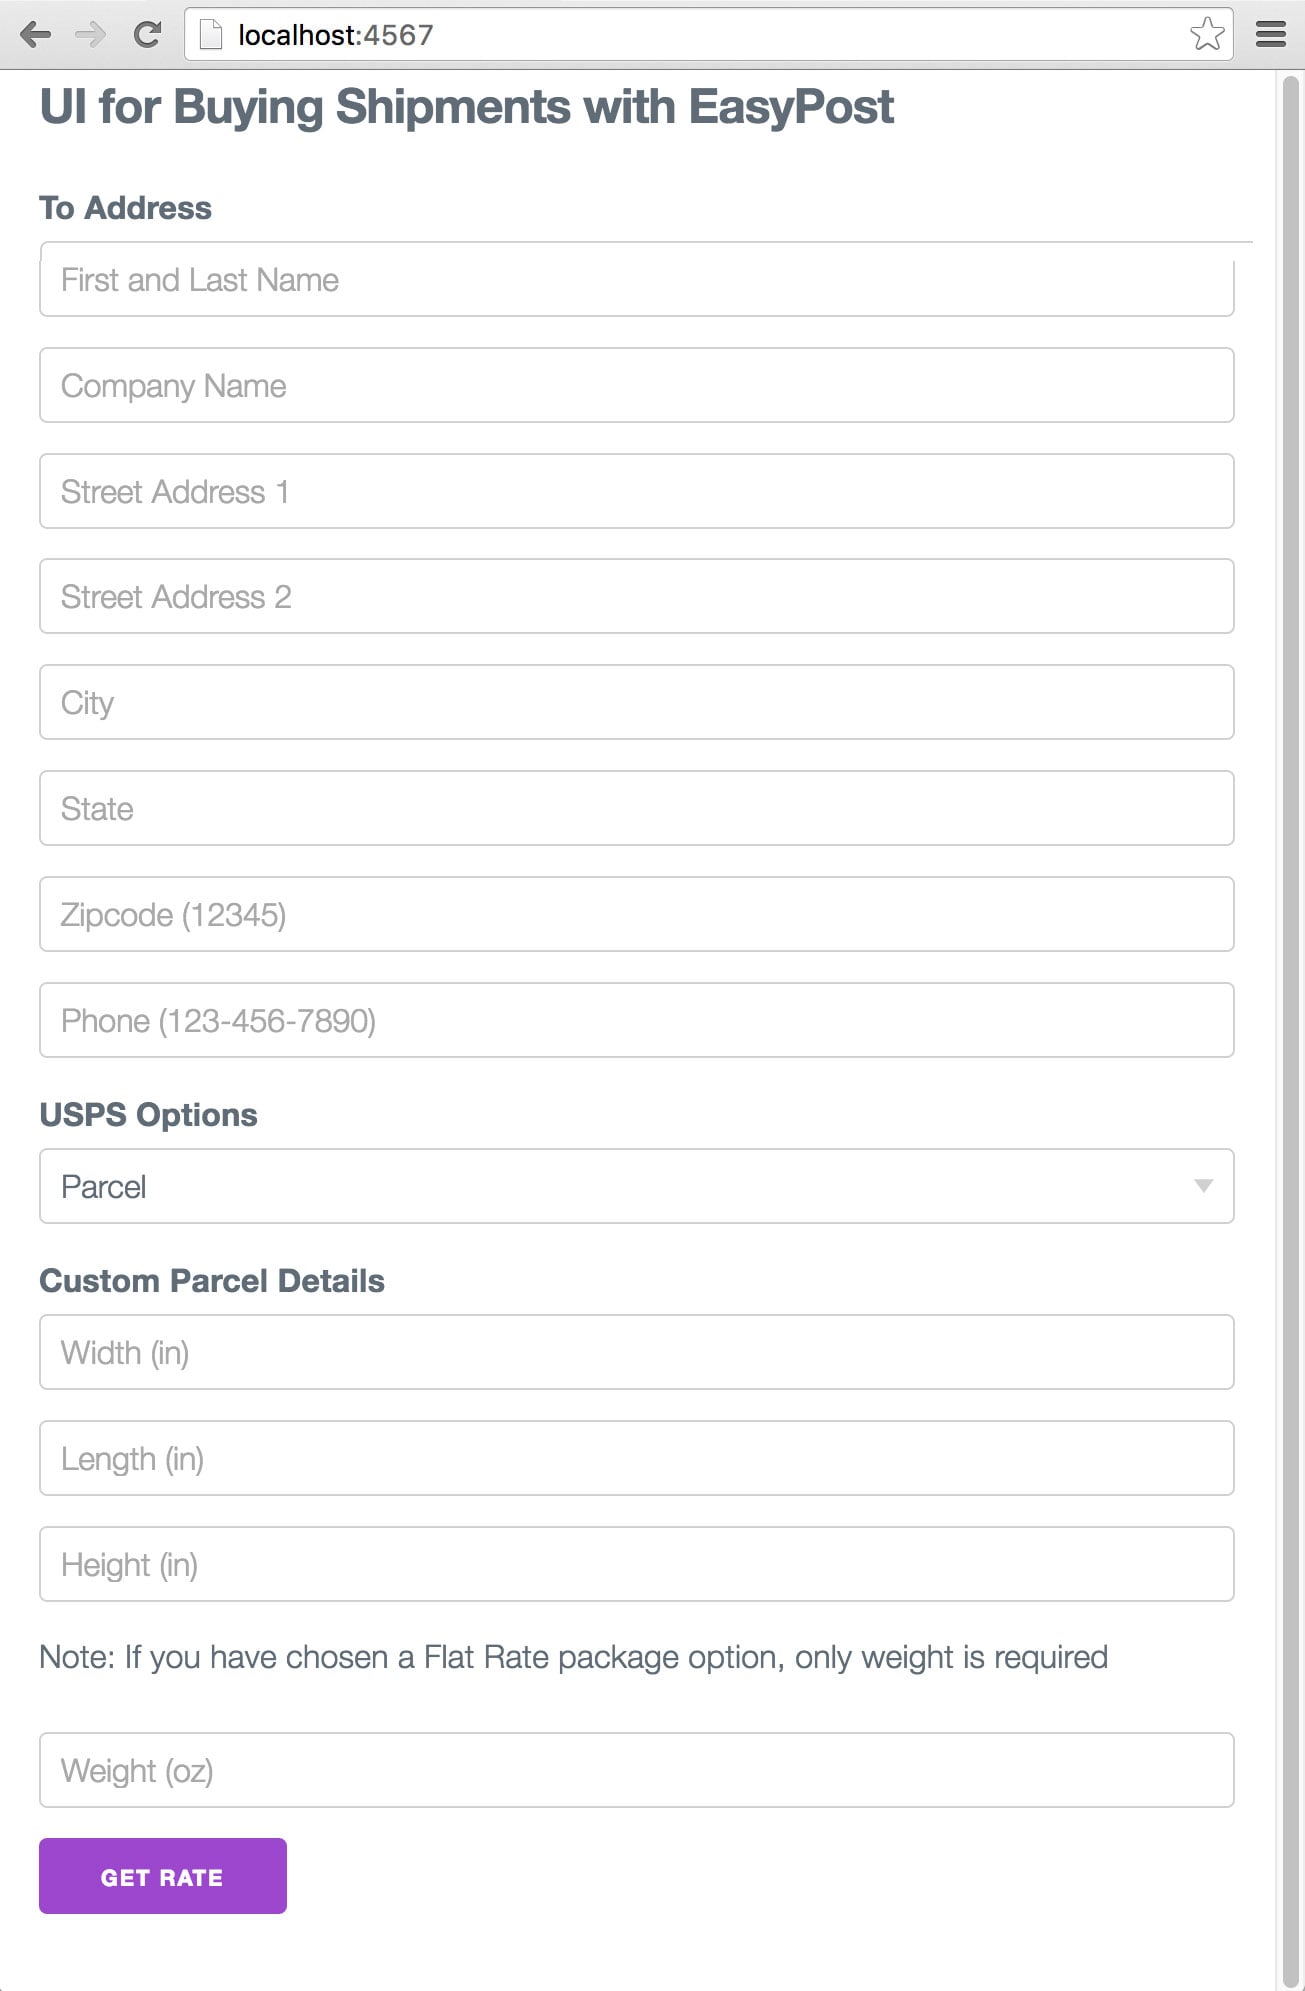
Visiting / in your browser should look like the below screenshot. Our example repo may have some slightly different css styles, but the HTML and functionality should be the same.

UI for Buying Shipments
2.4 Creating a Shipment and Getting Rates

We have a form set up at this point. But, in order to get rates, we need to create a shipment when the form is submitted. Let's create a POST route adjacent to our GET route that handles our form submission.

/app.rb

post '/shipment' do
  from_address = EasyPost::Address.new('FROM_ADDRESS_ID')

  # If creation fails, you will need to catch EasyPost::Error. See the GitHub
  # repository or the Errors guide for examples.
  shipment = EasyPost::Shipment.create(
    from_address: from_address,
    to_address: params[:address],
    parcel: params[:parcel],
  )

  redirect "/shipment/#{shipment.id}/rates"
end

If you'll ship to the same address more than once, consider storing the Address ID for to_address using the same principle that we used for our from_address (we recommend leveraging your database in this scenario). This will cut down on response times.

Now that we have a shipment object, we can provide the users with rates to buy the shipment. So let's create a route that retrieves the shipment and renders a page that lists the rates.

In app.rb add the following GET route:

/app.rb

get '/shipment/:id/rates' do
  shipment = EasyPost::Shipment.retrieve(params[:id])
  erb :rate, locals: { shipment: shipment }
end

We still haven't created a rate.erb view. To do so, create a rate.erb file inside /views that will display the rates.

/views/rate.erb

<table>
  <tr>
    <th>Rate id</th>
    <th>Rate</th>
    <th>Currency</th>
    <th>Carrier</th>
    <th>Service</th>
    <th>Select Rate<th>
  </tr>
  <% shipment.rates.each do |rate| %>
  <tr>
    <td><%= rate.id %></td>
    <td><%= rate.rate %></td>
    <td><%= rate.currency %> </td>
    <td><%= rate.carrier %></td>
    <td><%= rate.service %></td>
    <td>
      <form action = "/shipment/<%= rate.shipment_id %>/buy" method = "post">
        <button type="submit" name="rate" value="<%=rate.id%>">Buy</button>
      </form>
    </td>
  </tr>
  <% end %>
</table>

This code performs a simple iteration over our shipment's rates array and displays it as a table. The user can choose a rate to buy the shipment.

2.5 Address Verification (optional)

Verifying an Address before you ship is a great way to reduce issues with delivery. An invalid address may not return correct rates upon creation of shipment. In order to set up address verifications, there are couple of small additions to the above code.

  1. We will add a check box in the view where the user can choose to verify the to address
  2. Add our verification options to the address hash with the validation types we would like performed.

So let's go ahead and set up address verification. Add the following to the last line of the address partial, and replace your current post '/shipment' route with the code below.

/views/_address.erb

<input type="checkbox" name ="verify" value="true"> Verify Address

/app.rb

post '/shipment' do
  from_address = EasyPost::Address.new('FROM_ADDRESS_ID')
  to_address = if params[:verify] == 'true'
                 EasyPost::Address.create(
                   params[:address].merge(verify_strict: true),
                 )
               else
                 params[:address]
               end

  shipment = EasyPost::Shipment.create(
    from_address: from_address,
    to_address: to_address,
    parcel: params[:parcel],
  )

  redirect "shipment/#{shipment.id}/rates"
end

In the above example we have used the verify_strict verification parameter. EasyPost also provides the option of a verify parameter. Using the verify_strict parameter will raise an EasyPost::Error on address verification failures and will not create the address object. verify always creates the address object with a verification hash containing errors/warnings even if verification fails.

The zip4 verification performs CASS Validation and delivery verification checks that the address is deliverable. delivery verification may adjust an address or complete a 9 digit zip code based on the USPS address database. For your customers, we suggest that you display the corrected address back to the user and allow them to approve the verified address.

2.6 Buying Shipment

In order to buy a label for a selected rate, create a post route in app.rb.:

/app.rb

post '/shipment/:id/buy' do
  shipment = EasyPost::Shipment.retrieve(params[:id])
  shipment.buy(rate: { id: params[:rate] })
  redirect "/shipment/#{shipment.id}"
end

The code redirects to a route that isn't set up yet. Let's add a GET route that will retrieve the shipment and display a link to the shipment label and shipment tracking code on a page. Here's how:

/app.rb

get '/shipment/:id' do
  shipment = EasyPost::Shipment.retrieve(params[:id])
  erb :shipment, locals: { shipment: shipment }
end

In order to create the label view, add another file in the views folder and name it shipment.erb. Add the following to the label view.

/views/shipment.erb

<h3>CONGRATS!</h3>
<p><em>You have purchased a Shipment with EasyPost.</em></p>

<label>From Address</label>
<p>
    <%=shipment.from_address.name%><br>
    <%=shipment.from_address.street1%><br>
    <%=shipment.from_address.street2%><br>
    <%=shipment.from_address.city%>, <%=shipment.from_address.state%><br>
    <%=shipment.from_address.zip%> <%=shipment.from_address.country%>
</p>

<label>To Address</label>
<p>
    <%=shipment.to_address.name%><br>
    <%=shipment.to_address.street1%><br>
    <%=shipment.to_address.street2%><br>
    <%=shipment.to_address.city%>, <%=shipment.to_address.state%><br>
    <%=shipment.to_address.zip%> <%=shipment.to_address.country%><br>
</p>

<p><a href="<%=shipment.postage_label.label_url %>">Label Link</a></p>
<p>Tracking code: <%=shipment.tracking_code%></p>

Yep, that's it! That's all the code you need to create and buy shipments.

Step 3: Starting the App

Let's demonstrate all the functionality that we have added. Let's run our application!

As before, run bundle exec ruby app.rb from the project root, and you should see your application start up.

[2016-04-28 19:45:52] INFO  WEBrick 1.3.1
[2016-04-28 19:45:52] INFO  ruby 2.3.1 (2016-04-26) [x86_64-darwin15] == Sinatra (v1.4.7) has taken the stage on 4567 for development with backup from WEBrick
[2016-04-28 19:45:52] INFO  WEBrick::HTTPServer#start: pid=63201 port=4567

Then just visit http://localhost:4567 to see it in action!

We simplified things for the purpose of the tutorial, but you can view a more complete example in the repository on GitHub. The sample repo also demonstrates some basic error handling, and would serve as a great starting point to keep building off of!