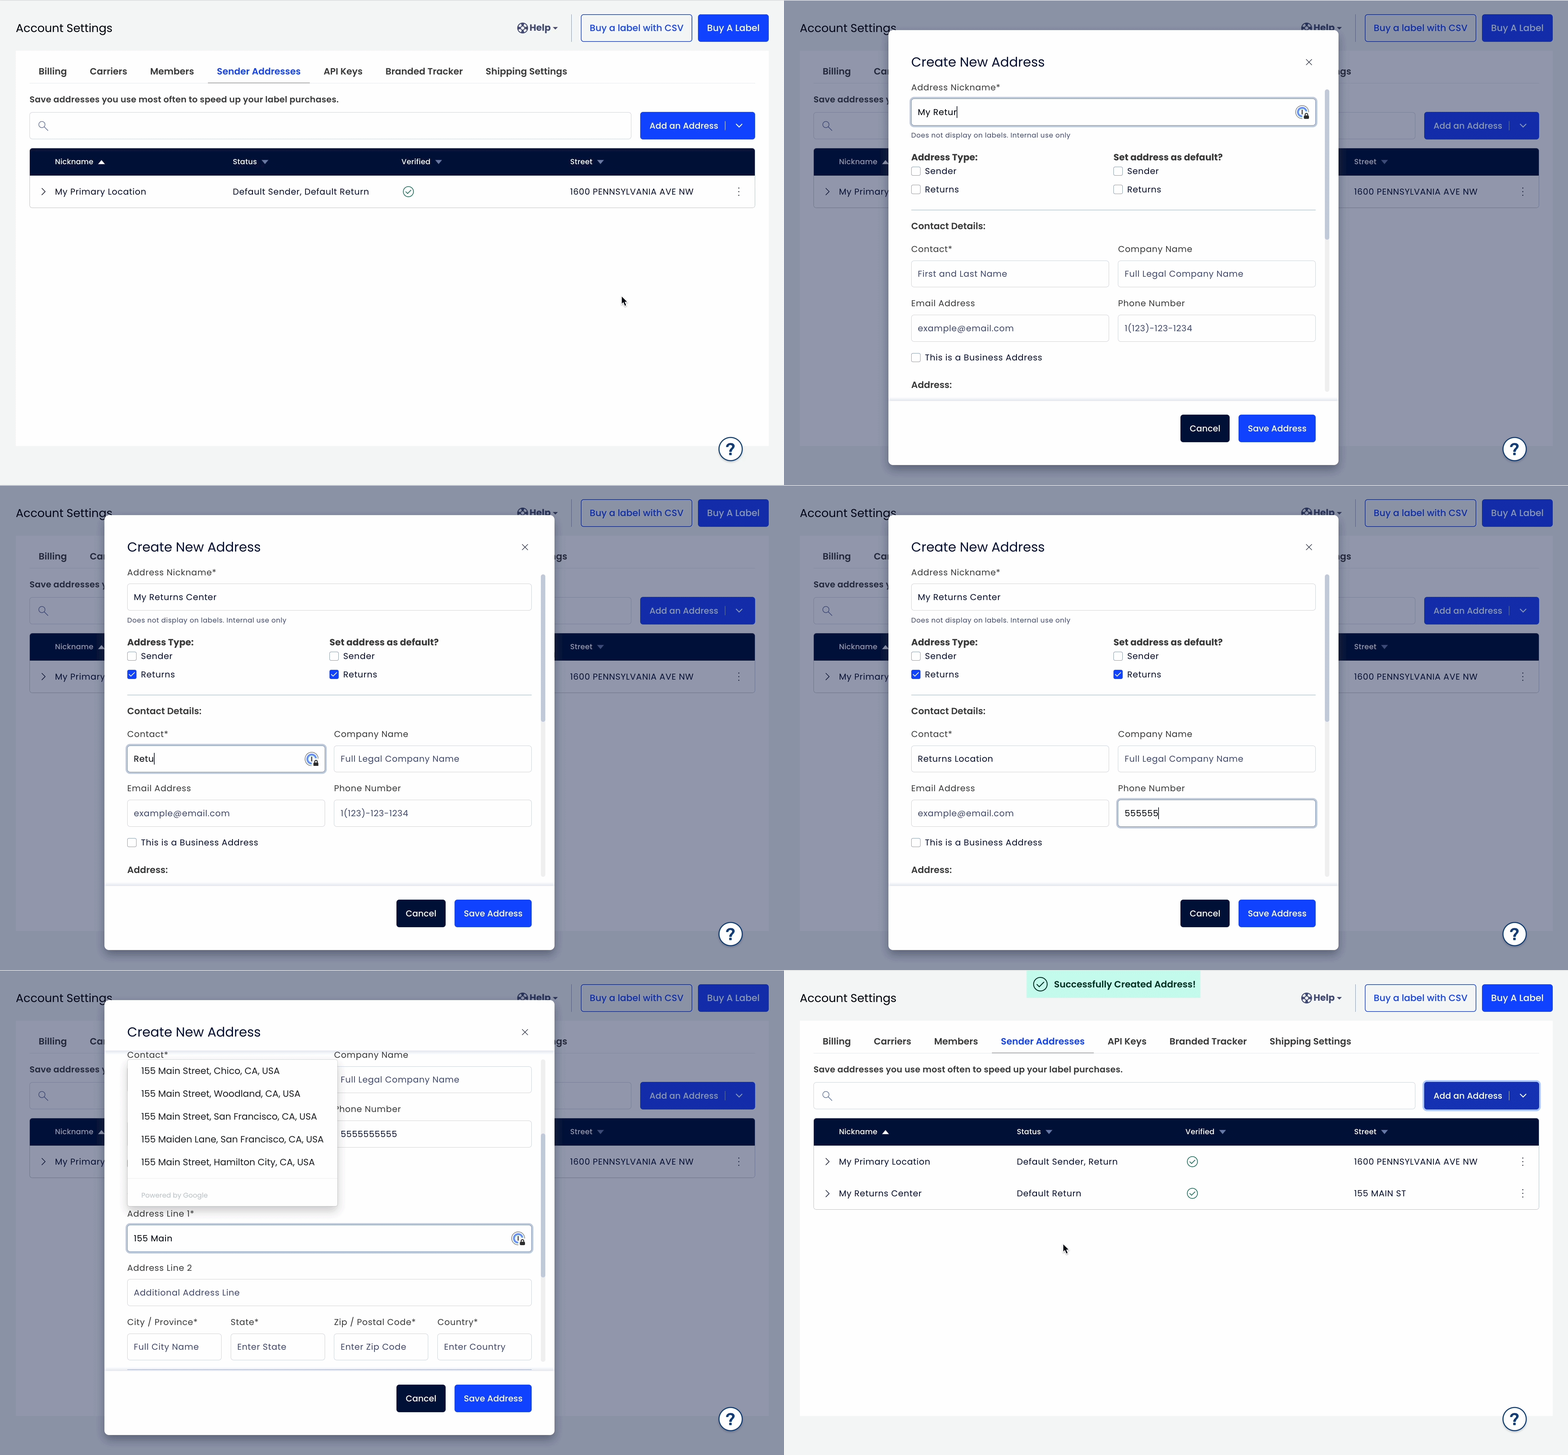
Our new Sender Addresses feature is coming to the EasyPost Dashboard for all users on Tuesday, January 16, 2024! The Sender Addresses tab can be found under Account Settings in the left sidebar, and it will allow users to create, edit, and delete sender or return addresses for their business. These addresses can then be quick-selected in the Create Label tool or referenced via address_id in the API.
This update is available to and free for all users. If you have any questions about the update, please reach out to your Customer Success Manager, Support, or visit our support article here.
Sender Addresses feature highlights
- Create, customize, and manage sender and return addresses within the Sender Addresses tab
- Import any existing EasyPost address_id created via the API to the Sender Management
- Set personalized nicknames to easily parse through your saved addresses
- Assign address to either sender, return, and default categories
- Select your saved addresses within the Create Label tool with one click
Sender Addresses in the EasyPost Create Label tool
Once you’ve created an address in the Sender Addresses tab, you’ll be able to easily select it when using the Create Label tool. On the left-hand side during the address stage, you’ll see all the saved addresses you’ve created. You can also click on the address to expand the row for more details.
If you need to ship from a different location from your saved list, simply click “Add Customer Addresses” under “One Time Address” at the bottom of the column.
How to create and manage addresses in Sender Addresses

Creating an address in Sender Addresses is simple!
- Log in to your EasyPost account and navigate to the dashboard
- Click on the “Account Settings” button in the left sidebar and select “Sender Addresses” from the available tabs
- Click the “Add Address” button in the top right corner, enter your information, and hit confirm!
After creating an address, you can always return to the Sender Addresses tab to edit or remove the address. And if you have already set a default address in the Create Label tool in the past, your saved address will automatically be imported into Sender Addresses.
FAQs
Can I set a custom name for my addresses?
Yes! When creating an address within Sender Addresses, you’ll be prompted to set a nickname of your choice. This nickname will not appear on your shipping labels and only serves as an internal reference.
We recommend leveraging this feature if you ship from multiple locations, such as your home, office, or various warehouses.
What does the verified column in Sender Addresses represent?
EasyPost will review your saved addresses at the time of creation with our Address Verification API. The verified column will allot a checkmark for addresses that have been verified.
How many addresses can I create?
At this time, users may create up to 10 unique addresses within the Sender Addresses tab.
Who can access the Sender Addresses tab?
For EasyPost users leveraging our user permissions through the Members tab, rest assured that only you and assigned Users can access the Sender Addresses tab. Users set to “Shipper Agent” will not be able to access the Sender Addresses tab; however, they can still select from the list of addresses you’ve already created when using the Create Label tool.
What happens if I edit the details of an existing address saved in Sender Addresses?
If you edit an existing address within Sender Addresses and change the fields above the break line—such as the nickname, sender/return checkboxes, or default checkboxes—then no changes will be made to the address_id.
However, if you change any part of the address itself, including the contact name or information, the address will be issued a new address_id. Please be aware of this change, especially if you also ship with our API. The EasyPost Dashboard will issue a warning to remind you if the address_id will change due to an edit.
If I use the shipping API and already have an address_id I frequently reuse, can I add that to Sender Addresses?
Yes, you can! In the Sender Addresses tab there is an “Import Address” button next to the “Create Address” button. Select the import option, enter your address_id and other details, and viola! The same address_id you use with the shipping API is available for quick-select in the Create Label tool.


