Tutorial: SMS Tracking Notifications

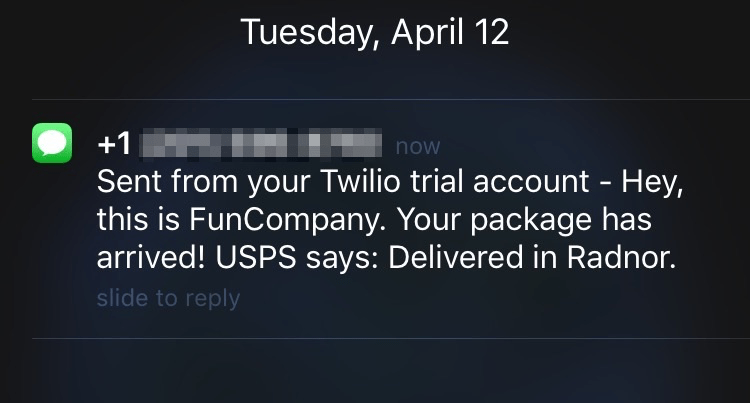
In this tutorial, we'll create a sample application that receives EasyPost Tracker updates via webhooks and sends SMS messages with Twilio.

The EasyPost Tracking API makes it simple to get EasyPost tracking updates with webhooks. Your application can be notified and take action as a tracking update happens. In this tutorial, we'll create a Flask application with the EasyPost Python Client that can receive webhooks from EasyPost. Then, we'll use the Twilio API to send a message to a test customer after a package gets delivered.

The end result

Although we'll use Flask (and Python) in this example application, this functionality could be integrated into any app written with Ruby, PHP, Java, and other languages with EasyPost's official client libraries.

Before You Start

  1. Sign up for an EasyPost account or log in to an existing account.
  2. Read the Getting Started Guide.
  3. Check out the Tracking Guide to get a feel for how Tracking works with EasyPost.
  4. Make sure you have Python and pip installed.

Step 1: Get Your Keys

The first thing we need is an API key from EasyPost. This is an example application, so we're going to use the test API key (of course, in a production application, you should use your production key.) You can find your test key on the API keys page.

In order to send SMS messages from our application, we'll use the Twilio API. Go to Twilio.com, click "Sign Up" and create an account. Once you're in, click the "Programmable SMS" button under "Products" to get your authentication details. You should see a page that looks something like this:

Twilio SMS dashboard

Copy the "Account SID" and "Auth Token". Then, click "Get your first Twilio Number" to generate the number the SMS messages will be sent from.

Next, open your favorite code editor and create a new file called config.py. Fill in the test EasyPost API key and Twilio details, so it looks something like this:

config.py

EASYPOST_API_KEY = "XXXXXXXXXXXXXXXXXXXXXXX"

TWILIO_ACCOUNT_SID = "XXXXXXXXXXXXXXXXXXXXXXXXXXXXXXXXXX"
TWILIO_AUTH_TOKEN = "XXXXXXXXXXXXXXXXXXXXXXXXXXXXXXXX"
SMS_TO_NUMBER = "1123456789"
SMS_FROM_NUMBER = "+1123456789"

Paste your "first Twilio number" in SMS_FROM_NUMBER. For SMS_TO_NUMBER, fill in the number of the cell phone you'd like to test with (of course, it must be able to receive SMS messages).

Step 2: Creating the App

We'll need the Flask microframework, the EasyPost Python client, and the Twilio Python API to make our app. We can install all three with pip from the shell:

$ pip install flask easypost twilio

Next, we can start writing our app. Create a file called app.py and save it in the same directory as config.py. Here are the first few lines:

app.py

import easypost
from flask import Flask
from twilio.rest import TwilioRestClient

app = Flask(__name__)
app.config.from_object("config")

easypost.api_key = app.config["EASYPOST_API_KEY"]
twilio_client = TwilioRestClient(app.config["TWILIO_ACCOUNT_SID"], app.config["TWILIO_AUTH_TOKEN"])

In these first couple of lines, we import the dependencies we installed, the app is defined and the config variables are loaded. In the last two lines, we instantiate the EasyPost and Twilio Python clients with the keys and tokens from config.py.

Now comes the meat of the application:

app.py

@app.route("/easypost-webhook", methods=["POST"])
def process_webhook():
    parsed_request = request.get_json()

    if parsed_request["object"] == "Event" and parsed_request["description"] == "tracker.updated":
        event = easypost.Event.receive(request.data)
        tracker = event.result

        message = "Hey, this is FunCompany. "

        if tracker.status == "delivered":
            message += "Your package has arrived! "
        else:
            message += "There's an update on your package: "

        for tracking_detail in reversed(tracker.tracking_details):
            if tracking_detail.status == tracker.status:
                message += "%s says: %s in %s." % (
                    tracker.carrier,
                    tracking_detail.message,
                    tracking_detail.tracking_location.city,
                )
                break

        twilio_client.messages.create(to=app.config["SMS_TO_NUMBER"], from_=app.config["SMS_FROM_NUMBER"], body=message)

        return "SMS update was sent to the customer!"

There are a few lines there, but the code is fairly straightforward! We know from the Webhooks Guide that incoming webhooks are POST requests, so we route /easypost-webhook with the POST method. We also know from the Tracking API that webhooks for tracked packages come in an Event object, so we create one with the EasyPost Python client.

Next, we compose a message to be sent to the customer. In this example, we have some logic dependent on the status of the shipment, and create a message which includes the most recent tracking information. Because the order of tracking details can vary, we iterate through the list of tracking details until we find one that matches the status of the Tracker.

Lastly, we send an SMS message from our Twilio number with the message that we just generated. We only need more two lines, to run the app in debug mode on port 12345:

app.py

if __name__ == "__main__":
    app.run(debug=True, port=12345)

Step 3: Starting the App

It's time to get the app started and see if we can get an SMS notification!

Open your shell, and run $ python app.py. The app is now running on port 12345, but there's one problem - since it's running locally, EasyPost has no way to access it! In a production application, our app would be running on a remote server, but there's no need to set one up for this example. Instead, we use a tool called ngrok that can temporarily tunnel our app to the outside world.

Visit the ngrok website to install ngrok on your computer, then open a new shell. Simply run
$ ngrok http 12345, and ngrok will take care of all of the heavy lifting. You should see a URL that looks something like "https://something.ngrok.io" in ngrok's output - copy it.

All that's left is to tell EasyPost where to send our webhooks. You can do this from the webhooks page, or by running the following cURL command (replace xxxxxxxx.ngrok.io with your ngrok URL and insert your actual EasyPost test API key):

curl -X POST https://api.easypost.com/v2/webhooks -u "$EASYPOST_API_KEY": -d 'webhook[url]=http://xxxxxxxx.ngrok.io/easypost-webhook&webhook[mode]=test'

It's time to see the results of our hard work! EasyPost will send us a webhook after we create a test Tracker. We use a test tracking code, "EZ2000000002" (you can find the full list of test tracking codes here):

curl -X POST https://api.easypost.com/v2/trackers -u "$EASYPOST_API_KEY": -d 'tracker[tracking_code]=EZ2000000002'

In a few minutes, you should get a customized SMS message when an "update" occurs on the test Tracker:

The end result

Awesome! If you're interested, try playing with message customization using attributes listed in the Tracking API.