Getting your ecommerce store up and running? To fulfill customer orders, you’ll need a fast, affordable way to print shipping labels. This article will run through all the steps to create a label yourself—but first, let’s discuss what shipping labels are and what information they include.
What is a shipping label?
A shipping label is a printed tag that contains essential information about a package, such as sender and recipient addresses. Labels are essential because they tell carriers everything they need to know to transport packages.
Every shipment requires a unique shipping label. While some information on a shipping label (like a tracking number) is automatically generated by the carrier, other information (like addresses) needs to be provided by your business. You can do this manually or use software like EasyPost to automate the process.
The anatomy of a shipping label: What’s included?
The information on shipping labels varies based on carrier; labels also look different for domestic and international shipments. To give you a general idea of what’s usually included when shipping domestically, check out the sample USPS label below.
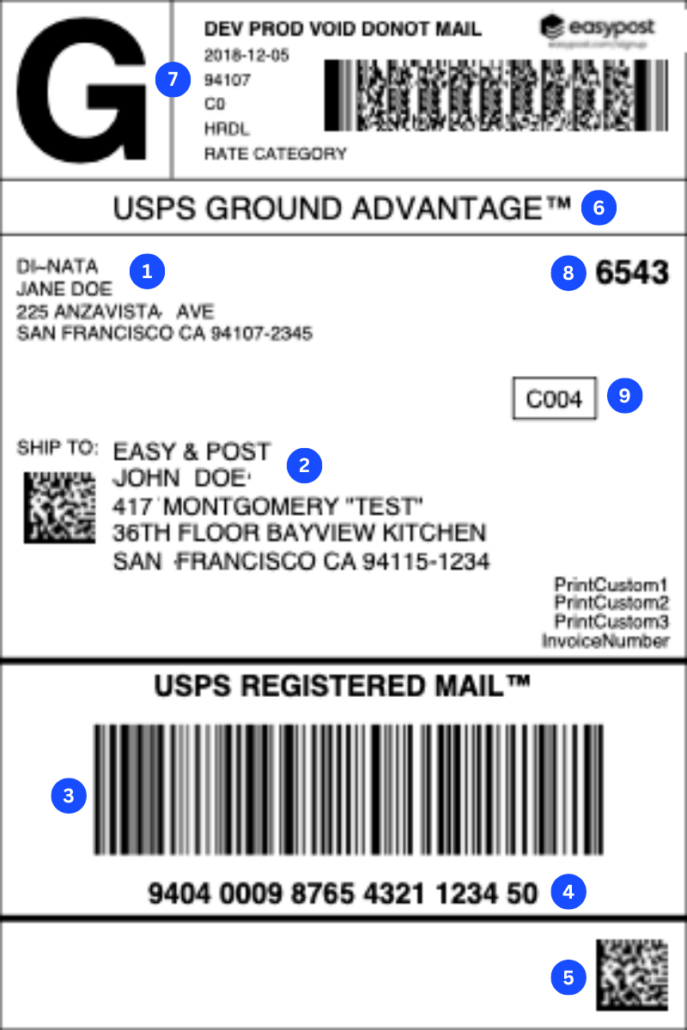
- Sender name and address. Use your business address here; if a package can’t be delivered to a customer, it will be sent back to you at this address.
- Recipient name and address. This indicates where the package is being shipped to.
- Intelligent Mail package barcode (IMpb). This barcode stores important information about the package.
- Tracking number. This number is also embedded in the IMpb. You should provide a copy of the number to customers so they can track their packages.
- Intelligent Mail matrix barcode (IMmb). This code contains the same data as the IMpb, but it’s easier to scan.
- Service banner. This indicates the mail class; a package with this sample label would be shipped using USPS Ground Advantage™.
- Service indicator. This symbol also identifies the mail class. If the shipment is HazMat, the service indicator will be an H.
- Regional distribution code (RDC). USPS will use this code when sorting packages.
- Carrier route code (CRC). USPS will use this code when sorting packages.
And there you have it: the anatomy of a shipping label. You’re almost ready to start printing! There are just a few preliminary steps.
Before you start printing labels …
… You need to take care of a few things. Making these decisions will help you choose the best strategy for creating your labels.
Determine your shipping needs
How often do you plan to ship packages? If your shipping volumes are low, you may want to rely on carrier offices to print labels. If you’re shipping dozens or hundreds of packages each week, it’s probably time to invest in your own tools, such as shipping software and a shipping label printer.
In the section “How to create a shipping label,” we’ll take a closer look at each of these options.
Choose a shipping carrier
Which carrier should you use? That decision depends on a variety of factors, including the size and weight of your packages, the distances they’ll travel, and whether you need value-added services.
Of course, you don’t need to limit yourself to one carrier. To take full advantage of each carrier’s service and pricing, use software to quickly connect to hundreds of large, regional, and local carriers and access discounted rates.
For in-depth advice about choosing the right carrier, check out this article.
How to create a shipping label
When creating shipping labels, you have two options: create and purchase labels manually, or generate them automatically using software. While the second option is more efficient and cost-effective, it can also require a little technical know-how.
Let’s walk through both methods.
Create labels online using a carrier’s website
If your business is still in its early stages, it may make sense to manually create labels online and print them yourself (or print them at a carrier store location).
Before getting started, gather the information you’ll need, including customer addresses. Keep in mind that unless you’re shipping flat-rate, you should know each package’s weight.
Below, you’ll find the steps for creating a shipping label with USPS, UPS, and FedEx.
How to create a shipping label with USPS
USPS explains how their label creation process works:
- Choose your service (USPS Ground Advantage™, Priority Mail®, or Priority Mail Express®) and pay for postage.
- Print your labels; if you don’t have a printer, you can have them delivered for a small fee.
- Schedule a free package pickup or drop your packages off at a USPS location.
To learn more, visit this page.
How to create a shipping label with UPS
UPS provides instructions for creating shipping labels:
- After logging in to your UPS account, click on “Create a Shipment” in the Shipping tab.
- Enter the package’s destination and return addresses.
- Provide additional shipping information and choose the service you want.
- Pay for shipping and print the label.
To learn more, visit this page.
How to create a shipping label with FedEx
FedEx offers two options for label creation: shipping as a guest or creating a FedEx account to create multiple labels at once. Their process is similar to the ones described above; you’ll need to enter package information, choose your shipping method, and pay the applicable rate.
No printer? FedEx explains how to print labels at a store location:
- Enter your zip code here to find a location near you.
- Click the “Copy and Print” button to find stores that offer printing services.
- Head over to the store.
- Email your digital label to the FedEx worker—or have them scan a provided QR code—to have the label printed.
To learn more, visit this page.
Use software to automatically generate and print labels
Your time is valuable, and manually gathering order information and creating shipping labels probably isn’t the best use of it. The solution? Use technology to automate the process.
With shipping software like EasyPost, you can generate labels using order information pulled directly from your ecommerce store. You’ll also have access to a range of helpful features, including address verification and package tracking, that make the delivery experience smoother for you and your customers.
Want to see how it works for yourself? Let us show you!
Best practices for using shipping labels
As you create labels and ship packages, keep the following best practices in mind to minimize shipping mishaps.
- Make sure information is correct. All the information on shipping labels should be accurate, including sender and recipient addresses, contact details, and package details. Inaccurate information can lead to delivery delays and other issues.
- Orient and attach your label the right way. To help carriers scan labels, place them on the package’s surface so they lie flat; avoid placing them on corners. Attach labels firmly so they don’t come off during shipping.
- Use specialized labels if necessary. Shipments containing hazardous materials, such as chemicals or flammable substances, often require specialized labels to comply with safety regulations. Perishables may also require special labeling.
- Make a plan for return shipping. If your package may need to be returned, consider including a return shipping label. This guide covers everything you need to know about return labels.
Frequently asked questions
Still have questions? We have answers!
Do you need a special printer to print labels?
Technically, you don’t need a special printer to print shipping labels—any printer will work. However, to print self-adhesive labels (those that stick to packages without tape), you’ll need a thermal printer. If you don’t have a shipping label printer, you can visit a carrier’s location to have them print shipping labels for you.
How much do shipping labels cost?
While shipping labels themselves are free, you need to pay for shipping. This cost varies depending on the carrier, package weight, and destination.
Note: When deciding how much to charge customers for shipping, make sure to factor in the costs associated with printing labels, including printer ink and blank adhesive labels.
Do shipping labels expire?
Some shipping labels may have a ship-by date. If you’ve passed that date and haven’t shipped the package yet, don’t worry—you won’t be charged. Simply create a new label.
Print shipping labels for free (and save on postage) with EasyPost
Printing shipping labels doesn’t have to be a hassle; in fact, it can be downright easy! EasyPost offers a suite of shipping APIs that automate the shipping process, saving you hours every week. Features include:
- Label creation. Start shipping with major carriers like USPS, FedEx, and UPS in just minutes.
- Discounted shipping. Access up to 83% discounted shipping rates.
- Package tracking. Provide real-time shipment updates to your customers.
- Address verification. Validate addresses to ensure deliverability.
- Shipping insurance. Protect shipments from loss, damage, or theft.